Odin SQL

Programming, software and technology

  • Blog
  • About
  • Contact
You are here: Home / Archives for Benjamin Knigge

Digital Ocean vs. Linode – Which virtual server?

December 31, 2014 by Benjamin Knigge 8 Comments

DigitalOcean vs. Linode

DigitalOcean vs. Linode

If you’re reading this you’re probably on the hunt For the best Virtual Private Server (VPS) that you can find and you’ve come to the correct conclusion that it comes down to DigitalOcean vs. Linode.

In this post I’m going to outline the pros and cons of each, present you the benchmarks and hopefully help you come to an informed conclusion.  So let’s get started with DigitalOcean vs. Linode.

DigitalOcean

DigitalOcean logo

DigitalOcean logo

DigitalOcean has been growing rapidly in the past year. They seem to be marketing themselves to developers new to the world of virtual servers and those with an extremely low budget.

Pros

low cost of Entry

The lowest cost server with DigitalOcean is currently $5 for a server with 1 cpu 512MB of ram and 2GGB SSD
Scale Up
The ability to scale an individual VPS up with your requirements.

Better than average performance

I’ve included some benchmarks at the bottom of this article but to summarize DigitalOcean performs better than average in benchmarks.

Multiple Data centers

At the time of writing DigitalOcean has 7 available data centers (of 9, 2 are sold out) Located in New York (2 of 3), Amsterdam (2 of 3), San Francisco, Singapore and London

Easy to use interface

They’ve clearly spend a good deal of effort making their web interface intuitive. Of the many VPS providers I’ve used, their interface is the best.

Quickly deployment of common applications

While setting up your “droplet” (DigitalOcean’s terminology for a virtual server) you are given to option to select one of many common applications. For example WordPress, Drupal, Jumla, lamp stack, lemp stack, magento this allows you to get up and running very quickly.

Cons

1GB Network

Shared 1GB network connection between all VPS on a server.

High network latency

The initial response times for a web request can be 100ms slower than with other VPS providers.

Slower SSDs

The Solid State Drives (SSDs) that DigitalOcean is using on it’s server are slower than some other providers.

Support

Their tutorials are terrific and the support department is generally helpful but isn’t always the most well informed. This could be the result of their rapid growth or it could just be poor training but the support department can be spotty.

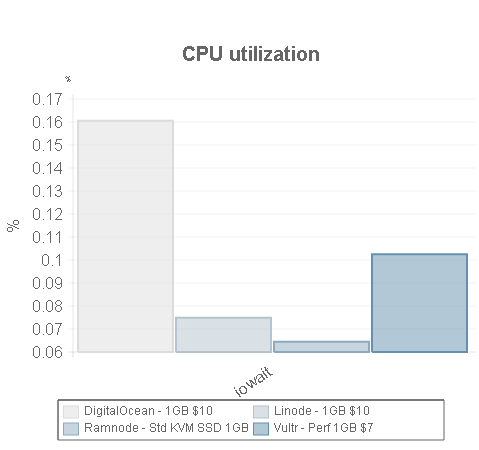
DigitalOcean Benchmarks

For the benchmarks I used, the benchmark script provided by ServerBear.com the tests were run on December 24th 2014 on VPS’s located in London for each provider. I chose the 1GB $10 plan for DigitalOcean  to compare to the similar $10 plan at Linode.


UnixBench score: 1460.8

I/O rate: 273.0 MB/second

Bandwidth rate: 48.4 MB/second

View the full ServerBear Benchmarks for this server.

Linode

Linode.com

Linode.com Logo

Linode has been around for several years and have recently done multiple upgrades to their network. They have a good reputation and are marketing themselves to experienced developers and corporations looking or lower cost “cloud” providers than alternative such as Amazon EC2.

Pros

Low cost of Entry
The $10 1GB 1 cpu plan maybe be twice the price as the lowest plan on at DigitalOcean but it also offers twice the memory.

Scale Up or Down

Linode offers the ability to scale an individual “node” (Linodes name of a VPS) both up and down as needed. If you’re expecting a holiday rush in November and December you could scale you’re node up at the end of October and then back down at the beginning of January.

5GB Network

Linode offers the fastest network of any lower cost VPS provider. Each server is connected with to a 5GB network and and each data center has a 20GB network connection

Fast SSD

The SSD that Linode is using are faster than those of DigitalOcean.

Multiple Data centers

Linode offers data centers in London UK, Tokyo Japan , Newark New Jersey, Atlanta Georgia, Dallas Texas and Fremont California

Load Balancers

With Linode load balancers as an option.

Server Stats

LongView is the name of Linodes server stats package that you can use to monitor utilization. The free version displays information for the past 12 hours. It very useful in determining if you should upgrade your node or diagnosing any issues that may arise.

Support

The support department seems to be pretty well trained and easily accessible.

Managed Hosting
Managed hosting and hourly system administration are available. A managed VPS is going to cost you $100 per month more than the same package that is unmanaged.

Cons

Low speed CPU
By no means are they slow but they’re significantly slower than some of their competitors offerings.

Less friendly UI

Although offering basically the same functionality the user interface is less intuitive than DigitalOcean.

Deploying applications on new VPS slower

Linode offers scripts that you can use to install most of the same applications that DigitalOcean does but that process is not as quick as easy as selecting the app or stack at the time of deployment.

Higher minimum cost

There’s not $5 option the lowest price VPS is $10.

Linode Benchmarks

For the benchmarks I used the benchmark script provided by ServerBear.com the tests were run on December 24th 2014 on VPS’s located in London for each provider.

UnixBench score: 520.1

I/O rate: 693.0 MB/second

Bandwidth rate: 44.1 MB/second

View the full ServerBear Benchmarks for this server.


Another option

For Raw Power there’s also another option that you may not even be aware of.  This past year a new VPS provider offering SSD, multiple data centers and fast cpu’s has launched.

Vultr

Vultr logo

Vultr logo

Vultr is still new and I haven’t deployed anything with them yet so I don’t have anything pro or con to say about them. They also have a $5 VPS with 768MB of RAM vs. 512 for the $5 VPS at DigitalOcean. Their benchmarks are also very impressive.  If the only reason that you are choosing DigitalOcean over Linode is the CPU benchmarks Vultr may be an even better option for you.

Pros

low cost of Entry

The lowest cost server with Vultr is currently $5 for a server with 1 cpu 728MB of RAM

The servers are significantly faster than either DigitalOcean or Linode.

Cons

Nothing major some of the functionality such as IPV6 support is still in beta and can be a bit buggy.

Vultr Benchmarks

For the benchmarks I used the benchmark script provided by ServerBear.com the tests were run on December 24th 2014 on VPS’s located in London for each provider. I chose the 1GB $7 plan for Vultr to compare to the similar $10 plan with DigitalOcean and Linode.

UnixBench score: 2250.4

I/O rate: 447.0 MB/second

Bandwidth rate: 31.3 MB/second

View the full ServerBear Benchmarks for this server.


Conclusions

DigitalOcean has almost three times the cpu power of a Linode VPS with similar specification however Linode is twice as fast and operations involving disk I/O. Simplified that means that DigitalOcean would be better at anything involving heavy calculations such as complicated database joins or on processing complicated PHP scripts while Linode would be better at serving up static content like images or html documents quickly.

Recomendations

I personally use both Linode and DigitalOcean and have overwhelmingly positive things to say about each of them. Other VPS’s that I use include those with Vultr and RamNode. This site is currently hosted on a $10 Linode VPS but I pan on moving it over to RamNode once my existing credit with Linode is used up. It’s important that you evaluate the requirements of your own applications.  I primarily use DigitalOcean and Vultr for development and staging and RamNode or Linode for production. Linode offers better I/O on a superior network  their support staff are excellent and if need be are available at an additional cost to help resolve any emergencies that may arise.  You should evaluate the resource requirements of your own applications and if you need the extra cpu power Vultr maybe be the best choice for you but only if you are willing to tolerate slower I/O and a slower network. DigitalOcean may be a good middle ground and because of the simplified deployment of applications is an excellent choice to someone new to managing a VPS.  I hope that this post has at least helped made a well informed decisions.

Sign up for Linode

use the coupon code “LINODE10” (without the quotes) for $10 credit


Singn up for RamNode


Sign up for DigitalOcean and receive $10 in credit


Sign up for Vultr

use coupon code “SSDVPS” (without the quotes) for $20 in free credit but it must be used within 30 days


After reading through all of this you’ve decided that you would rather leave the management of you server in the hands of professionals have a look at

CloudWays Managed VPS

CloudWays offers VPS management on top of DigitalOcean’s network

That’s it for my post on DigitalOcean vs. Linode.  If you’ve noticed a mistake, have a comment, suggestion, think I’m an ass hat or would like a custom recommendation let me know in the comments.  If you would like me to benchmark some of the other plans offered by these VPS providers let me know.  If you would like to keep updated periodically regarding new content please join my mailing list by filling out the form in the right side navigation.  Thank you for reading.

Filed Under: Hosting Tagged With: DigitalOcean, Hosting, Linode, VPS, Vultr

8 Mistakes when choosing a web host

December 30, 2014 by Benjamin Knigge 1 Comment

8 common mistakes made when choosing a web host

8 common mistakes made when choosing a web host


Before I list out some of the most common mistakes people make when choosing a web host I should detail what the common types of hosting are.

What are the basic types of hosting?

Let’s begin with the premise that there are are three basic types of hosting :

  • Shared
  • Virtual Private
  • Dedicated

Shared

With shared hosting everyone is sharing all of the resources of a single dedicated or virtual server if one of the other shared hosting customers on the same server is getting a lot of traffic or running a resource intensive process the performance of everyone else’s web site on the same server is going to suffer the consequences. The companies that sell shared web hosting will often put thousands of websites on the same server. This is by far the most popular hosting option because of the price.  Shared hosting is often incredibly cheap however it’s also incredibly unreliable.  This may be an acceptable hosting option for a vanity blog or uploading some photos of your kids but it’s unreliable and I wouldn’t want my business to depend on it.

Virtual private server

A Virtual Private Server is usually referred to as a “VPS”. The way that a VPS works is that there is a host Operating System or “OS”  that is responsible for managing the communicate with undying hardware for each guest OS that is assigned to a customer.  Typically the resources of the server are allocated in different proportions to each guest. For example lets say that the underlying hardware is an 8 core CPU with 8GB of RAM an 80 GB hard drive.  There are eight VPS hosted on this server and they each have 1 cpu 1GB RAM and 10 GB of hard drive the possibility of having a bad neighbor that hogs all of the resources is minimized.  However many VPS hosting providers will sell that same server as either 8 core cpu VPS with 1GB RAM and then you’re back  to having the same bad neighbor problem you had with shared hosting. It can be hard to figure out what you’re actually paying for with a virtual server.

Dedicated hosting

Dedicate hosting is also often referred to as collocated hosting. With a dedicated server you’ve got the server to yourself most of the time you won’t need more than only a few percent of the resources and there’s no one else to share the bill with.  If there’s a hardware failure it may take a while to get things back up.

So now that we’ve defined what we’re talking about what are the common mistakes that people make when choosing a web host?

Common mistakes made when choosing a web host.

Letting a domain name registrar host your website.

I’ve never heard of this working out well for anyone and I’ve heard numerous horror stories.  I’ll admit that it’s easy and cheap but when it comes to stuffing as many shared hosting plans as possible ( and often time far beyond ) domain name registrars are among the worst offenders. I’ve already mentioned why it’s a bad idea to depend on shared hosting if you’re dependent on your website for either revenue or marketing but to reiterate it’s often slow and unreliable due to the fact that you’re at the mercy of every other website that’s being hosted on the same server.

Choosing a service based on price alone.

Not all hosting is created equal.  If you’ve found a hosting package that costs $15 a year it’s highly unlikely that you’re going to have any luck getting in contact with the support department if your site goes down at 3 am on a Saturday.  If you’re fine with your web presence being slow and unreliable then by all means go cheap.  If you would like something reliable, plan on spending between $15 and $30 a month for a moderately low traffic web site with a host with a fully staffed support department.

Paying for services they don’t need

If your website takes up 100MB of disk space and averages around 300 daily unique visitors and is only of interest to people in Boise Idaho looking for a dentist, you don’t need to pay for a 100GB of disk space on an 8 core VPS with with 32GB of RAM and a global content distribution network. The salesman on the other end of the phone line at the hosting company is not someone that should be trusted when it comes to what you should be paying for.  Paying too much for hosting is almost as common as paying too little.  Spending several times more for hosting for services that you will never use will not result in any better outcomes for your website.  At least 90% of you should be  spending $15 – $30 a month on hosting. I’m hosting this web site on a $10 a moth VPS with a $2.50 a month backup plan and it’s capable of handling 15,000 page requests per minute.  How much traffic your site can handle will depend on what your web site is doing behind the scenes and how it has been configured.

Getting in over their head.

An unmanaged VPS is going to be much less expensive than a managed VPS, but if you don’t know what you’re doing and you are either unwilling or unable to dedicate the time to learn your’re going to end up bring you site down or getting hacked.  Be honest with yourself. If you’re not in the business of keeping servers secure and properly configured you’re probably much better off with managed hosting. You may be limited in how you’re allowed access to your server and what you’re allowed to do but that’s the trade off for putting someone else in charge of your websites stability and security.

Choosing a host that’s too small.

A small company may have developed your site but they’re probably not be the right choice to host it. You’re neighbor Jim’s cousin John might be a genius but if the server he’s running in his bedroom closet crashes while he’s away on a two week vacation are you fine with your site being down until he get’s back to fix it?  Choose a hosting company that has a good reputation and 24 hour support. If you’re planing on switching call or email them on a weekend nigh and see if you get a response. If you don’t hear from anyone until the following Monday their probably not worth doing business with.

Choosing a host that’s growing too fast.

When a hosting company is providing a good product at a fair price the word gets out and the hosting company can rapidly grow exponentially. This is great if you’re the owner of the hosting company, but can often be bad news for the hosting customers. They’ll need to bring on new employees or overwork the employees they have. The new employees may not have the same level of experience as the employees that were working when the hosting company established it’s stellar reputation. In addition to the employee problems the underlying infrastructure may not be able to handle additional load. Their 1GB connection maybe have been adequate when they were 1/10 the size but now the traffic from 10 times as many servers have clogged their narrow pipe.

Choosing a host that is brand new.

Doing business with a company with a good reputation is much less stressful than a company with no reputation. Mistakes happen and they’re more likely to happen at the beginning, when a company and it’s employees are new.

Choosing a host based solely on performance benchmarks.

The majority of websites don’t need to be hosted on incredibly powerful servers.  One marketing ploy is to mention the speed speed of the CPU which is useful when you’re doing many complicated database queries but is almost meaningless when you’re serving up static files. For most websites the hosts data connection speed will be more important to their sites performance than the CPU speed on the server.  For example this site is hosted on a $10 a month Linode VPS and is capable of serving up to 15,000 requests per minute because of the way I’ve configured it and the fact that my Linode server has a 40Gbps data connection on a 160Gbps network.  The raw CPU power is actually significantly lower than what I can find with other VPS providers but many of those providers servers are only using 1Gbps data connections on a 10Gbps network.

Failure to have a backup

Lastly and it’s not a hosting mistake, so I didn’t count it as one but still deserving of a mention. The failure to ensure that there is an adequate backup plan in place.  If something goes wrong and you don’t have a backup you are ultimately the one that will be left to face the repercussions.  Get a back up of your site and keep it safe. Make sure that your site is regularly being backed up, and make sure you know what is needed to do in order to recover your site from the backup.

 Hosting Recommendations

Personal non-revenue generating

If you’re hosting a family photo album or a blog that generates no revenue and the possibility of a bit of downtime is something you can live with,  shared hosting is adequate for your needs but even then I don’t recommend it. A better option would be to use a $5 per month managed VPS with CloudWays. You won’t have any of the headache associated with managing your own VPS and getting everything up and running is painless.

Sign up for CloudWays


Small business or individual with sysadmin skills

If you are a small business or individual with the necessary server management skills a $10 Linode VPS with the $2.50 backup option is most likely powerful enough for your needs. This is the plan that I’m hosting this site on.
Sign up for Linode


Small business managed hosting

For small businesses or individuals dependent on their web sites for revenue generation or marketing I’m going to recommend a low budget Managed VPS provided by Cloudways. CloudWays  adds management and support to a VPS provided by either DigitalOcean or Amazon. You can choose which underlying hosting company you use at the time of registration. With this option you loose a bit of the freedom you would have with a self managed VPS but you gain security and stability.  Based on both Price and Performance my recommendation is that you choose DigitalOcean as the underlying VPS provider and the $30 a month plan should be adequate for most small business.

Sign up for CloudWays


Larger site managed hosting

For larger businesses and sites receiving substantial traffic that need powerful servers and don’t want the headache of having to manage them, I’m going to recommend Linode managed hosting. Linode charges $100 per month in addition per VPS for management.  They also offer sysadmin and development services at the rate of $100 per hour.

Sign up for Linode

Raw performance or large storage.

If for some reason you need a lot of raw performance at a low cost or large amounts of  magnetic disk storage Vultr offers VPS’s that have both of those bases covers.

Sign up for Vultr
I think that pretty much covers everything there is to say in this post.  If you’ve noticed a mistake, have a comment, suggestion, think I’m a jerk or would like a custom recommendation let me know in the comments.  If you would like to keep updated periodically regarding new content please join my mailing list by filling out the form in the right side navigation.  Thank you for reading.


Filed Under: Hosting Tagged With: Amazon EC2, CloudWays, DigitalOcean, Linode, Vultr

The importance of load testing a website (for free)

December 29, 2014 by Benjamin Knigge 3 Comments

So you’ve got your site up or you’ve just finished your awesome new mobile app, but how many users can it handle before it comes to a screeching halt leaving a negative impression on your end users and pissing off your boss, investors or partners?

Why is load testing important?

The worst time to discover that your current infrastructure can only handle 100 simultaneous users is when you have 1000 simultaneous users trying to access your site after you’ve spent a significant amount of money on marketing, or if you’re lucky enough to have a positive article about your company publish in a major newspaper or magazine.

If you plan on 10,000 simulations users you need to test for at least that many users. It’s easy to write a web app that can respond to one user at a time it’s significantly more difficult to write a web app that can scale up to 100,000 or a million simultaneous users.

Many of my freelance clients approach me in extreme desperation after hiring the lowest bidder on one of the many freelance development marketplaces and discovering that  their site becomes extremely slow or even unresponsive with only a few simultaneous users. The developers they hired were quick to push out a site that has an illusion of functionality but a few weeks later is more of a liability than an asset. These clients are never happy when I tell them that building a web site that scales well can be significantly more expensive and time consuming than what they’ve currently invested.


How many users do you plan on?

Currently this blog is only 3 weeks old and is averaging about 500 unique users per day with my highest day being 1200. Ideally I would like to have 100,000 unique users per day (I can dream) on average but the requests are not distributed evenly throughout a 24 hour period. The majority of my users are visiting from late morning to early evening in North American time zones. This traffic pattern is fairly typical for a website targeted at native English Speakers. The United States and Canada make up the majority of the native English speaking population on the web.  I’m getting a decent amount of traffic from the UK and Australia but they’re not typically visiting during my peak hours of utilization.

My busiest hour is between 4 – 5 pm eastern standard time and during that 1 hour I’m getting about 20% of my blog traffic for the day.  If that patters hold true while my site continues to grow and gain a following, will I be able to handle the traffic on my current $10 a month Linode VPS? If my plan is 100,000 I will need to test for 20,000 per hour or 334 per minute during my busiest hour.


How to load test?

There are numerous services and testing frameworks available.  I’ve gone with loader.io because it’s easy to use and there is a free plan available that can simulate up to 10,000 simulates users. they are owned by SendGrid so I don’t think they’re going to disappear anytime soon.

Setting everything up and getting started is pretty simple. You register for free (actually free no credit card required). They send you a confirmation email.  You validate your email and then you’re ready to add a site. After entering your domain name you have to validate that the site is yours. They do this by having you upload a text or html file containing a unique string. This step is necessary to prevent malicious users from using their service to overwhelm a website.  You’re basically designing a test to discover the limits of your web site that is almost identical to a denial of service attack if your web site can’t handle the load that you’re going to be sending at it. I’ve included a screen-cap below of the test adding interface it’s all pretty simple.  You point them at a URL and tell them how many users you want to simulate over a given period of time. You can start the test immediately or schedule the test for when you your site is usually under light load.  It’s not a good idea to load test a live site that you or your clients are dependent on for revenue.  You may want to point the test at a development server.

It’s important to note that the free version of loader.io only loads a single URL and doesn’t load any included js, css or images or run any javascript that may be making api calls.  This isn’t a problem for me since CloudFlare is serving up all of my static content and I’m not making any api calls. If you are making many API calls in JavaScript then this might not be a suitable solution for your load testing needs.

Loader.io add a test interface

Loader.io add a test interface (click to enlarge)


What do the results look like?

I’m fairly confident in the way I’ve set up this WordPress blog It may only be a $10 Linode VPS that it’s running on but I’ve configured WP Super Cache and Nginx is really good at serving static files. I’m also using CloudFlare as my content distribution network. I think that my site can handle 10,000 users per minute.  Let’s see if I’m correct.

loader.io results for OdinSQL

loader.io results for OdinSQL (click to enlarge)

So it looks like sending 10,000 requests at my server in a minute resulted in 100% success. If my site is capable of serving 10,000 users in a minute it should be fine handling  100 – 200 thousand users per day without any problem.

If you would like to see more detailed results from my test here’s a link to the results on loader.io


Update:

After my initial post I decided to  to test the limit of my current configuration.  I ran tests with 15,000, 17,500 and 20,000 requests per minute.

I handled 15,000 requests pretty well.  –15,000 report–

At 17,500 my response times were starting to get pretty bad but the site was still functional. –17,500 report–

20,000 requests per minute brought this site down response times were over 3 seconds and about 1/3 of the requests resulted in a timeout error.  I had to abort the test at 55 seconds.  –20,000 report–

So now I know If I’m getting more than 15,000 page requests per minute I’ll need to do some upgrades.  Realistically though I would upgrade long before that.

If you test your site, please post the results here in the comments. Let us know what kind of hosting you are using and your configuration. If you’re results aren’t that great I’ll try to give you some advice and help you improve them.


If you would like to test your own site
Try loader.io for Free


If you’re in need of a great web host I highly recommend that you

Sign up for a Linode SSD VPS

After reading through all of this you’ve decided that you would rather leave the management of you server in the hands of professionals have a look at

CloudWays Managed VPS

CloudWays offers VPS management on top of DigitalOcean’s network

That’s it for this post. I hope that you’ve found the information it contains useful. If you have any questions, criticism, advise or suggestions please leave me a comment below and let me know.  If you would like to stay updated about new content on OdinSQL.com I would like to invite you to join my email list by filling out the short form on the right side navigation.  I promise not to fill your inbox with spam if you do.

Filed Under: Hosting, programming, web development Tagged With: loader.io, SendGrid, Wordpress

Free SSL with CloudFlare, OpenSSL and Nginx on Ubuntu

December 25, 2014 by Benjamin Knigge 9 Comments

How to Save up to $750 in SSL fees for free

In this post I’m going to show you how to set up your site so that you will have an absolutly free fully SSL secured site that automatically redirects non secure HTTP traffic to your secure HTTPS URL.  A basic SSL certificates commonly cost $45 – $75 per year.  I’m going to show you how to create and install an SSL cert that’s good for the next 10 years and cost you absolutely nothing.  Google now gives SSL secured site a boost in it’s search algorithm.  Implementing the solution outlined in this post has both SEO as well as security benefits.  For this tutorial I’m using Ubuntu 14.04 if your using another distribution the steps will be pretty much the same but the paths to the config files may be different.

What you will need

      • root or sudo user Access to your Linux VPS (Virtual Private Server) or dedicated server
      • An existing web site on an Nginx web server ( you’ll have to improvise if you’re on Apache  in this post I’m only covering Nginx)
      • A 100% free CloudFlare.com account (No BS It really is 100% free they don’t ask for a credit card. I’m sure that they would like you to sign up for one of their premium packages but they’re not forcing it down your throat)


If your in the need of a good, low cost reliable VPS provide I personally recommend and use both Linode and DigitalOcean with my preference between the two being Linode. This site is hosted on a Linode VPS behind CloudFlare’s reverse proxy service. If you sign up to either Linode or DigitalOcean using links on this page I’ll get a free month of hosting.  In addition DigitalOcean will add a $10 credit to your account.

If you’re not already using Nginx to host your site I’ve created another tutorial of how to easily configure Nginx on a VPS right here. This tutorial begins with the assumption that you already have a site up and running and that you are using Nginx as your web server.

The 4 basic steps

      1. Set up CloudFlare
      2. Create an self signed SSL cert using OpenSSL
      3. Configure our website to use our new SSL cert and redirect everything to HTTPPS;
      4. Flip the switch on CloudFlare to enable full SSL.

Basic step #1 Set up CloudFlare

What is CloudFlare and what do they do?

CloudFlare

CloudFlare

CloudFlare runs DNS based content distribution network that also has some pretty nifty analytic and security features. If you’re using their service and someone goes to www.your-site.com they send the request to the nearest server on their network which tries to serve the cached content if it already exist and they are able to do that or forwards the request to your server. This is whats more commonly knows as a reverse proxy. All of this ends up taking milliseconds and results in your server being put under less stress and your pages loading faster for your users. In addition to that they’re able to filter out malicious bots and mitigate denial of service attacks.  At the end of September 2014 they announced that they were going to give this service away for free and they were also going to provide a free SSL cert. They explain it a bit better in their Universal SSL blog post. We can set up SSL with CloudFrare in two different ways either they can access your non secure site and then proxy it to to port 443 on their servers or they can access your secure site and then proxy it to their server. The second option is more secure and what we will be implementing in this post. If you you would like to give the first method a try all you need is to set your domain up on CloudFlare.

I think their service is awesome I’m using it for free on this site and I would recommend that pretty much everyone else use it as well.

Sign Up

Head over to CloudFlare and sign up for their service. It’s fairly painless and easy. They don’t ask for any billing information or require a credit card. All you need is an email address.

Add your domain name

After you’ve signed up your going to enter your domain name.  CloudFlare will then pull down the DNS records for the domain you’ve entered.

Verify your DNS records

CloudFlare DNS entry screen

CloudFlare DNS entry screen (click image to expand)

CloudFlare is pretty good about pulling everything down but if you have any special txt records like sfp records it’s possible that they could miss them.  You should open up your dns records with your current dns host. Enter anything that’s missing or incorrect before moving onto the next step.

Update your name servers

Once all of your DNS records are correctly entered into CloudFlare you will need to update your existing name servers with your domain name register (godaddy, namescheap, networksolutions etc..). You will need to check the documentation provided by your domain name register on how to do this. You’ll replace the old name servers with the name servers that CloudFlare has provided you.  For me they were “sri.ns.cloudflare.com” and “vera.ns.cloudflare.com” but you should use what is provided by CloudFlare for your domain.  Once you’ve updated your name server it can take up to 48 hours before all of the DNS servers on the internet update their information and know that they should be requesting DNS information about your domain from CloudFlare.

CloudFlare Green status Icon

CloudFlare Green status Icon

Usually the update happens within an hour or two. Cloudflare will dispaly a green icon next to your domain name in their control panel letting you know when everything has updated.

At this point you can move on to step #2 but don’t start step #3 until after cloudflare is handleing your DNS 2 – 48 hours from now. You might want to bookmark this page and come back.


Once your DNS is on CloudFlare You should be able to enable basic SSL by going to your settings page.

CloudFlare Settings

CloudFlare Settings (Click image to expand)

On the settings page enable “Flexable SSL”

CloudFlare Flexable SSL

CloudFlare Flexable SSL (Click image to expand)

At this point you should be able to enter https://your-site.com into your browser.  You should see the lock icon next in the address bar to the left of your domain name. The SSL encrypted connection is between your browser and CloudFlare’s proxy server however the connection between CloudFlare and your server isn’t yet encrypted.  If we want to encrypt the connection between your server and CloudFlare and enable redirection to only the SSL secured version of your site you are going to need to install an SSL Cert on your server.  The good news is that you can use a self signed SSL cert that won’t cost you a penny and I’m going to show you how to do that.

Basic step #2 Create your SSL Cert

sudo mkdir /etc/nginx/ssl

sudo openssl req -x509 -nodes -days 3650 -newkey rsa:4096 -keyout /etc/nginx/ssl/server.key -out /etc/nginx/ssl/server.crt

So on the first line we’re creating a directory to store our SSL certs in. On the second link we’re telling OpenSSL to create a self signed SSL cert that expires ten years from now and put it in our newly created directory. You’re going to be asked a few questions about your location, company name, department, common name the only one of these that is important is common name it should match your site exactly if your site is www.your-site.com enter www.your-site.com if you plan on accessing your site without the www the it would be just your-site.com for example on this site I don’t use the www prefix so I would just use “odinsql.com” as the common name.  None of this is really all that important as CloudFlare won’t be using the information from this cert to your users. In fact I have several different web sites using CloudFlare using the the same self signed cert.

Basic step #3 Enable SSL on your site

Before you begin this step it’s important that your DNS is now being handled by CloudFlare if it’s not this next step is going to end up bringing your site down. So double check.  The icon next to your domain name should be green in CloudFlare.

Let’s move to the nginx config directory for your available web sites on Ubuntu we would do the following to get a list of the config files for the sites on your server.

cd /etc/nginx/sites-available

ls

sudo cp example.com.conf example.com.conf.bk

sudo nano example.com.conf

The command cd changes the directory in this case to the directory containing the config files for our web sites.

We should create a backup copy of your sites config and to do that we use the “cp” command. The first parameter of cp is the file that we want to make a copy of and the second is the name that we are going to give the copy.

Nano is a text editor replace “you-site.conf” with the the file name for your site.
Your config file should look something like this.

server {

server_name example.com www.example.com;

access_log /var/log/nginx/example.com.access.log rt_cache;
error_log /var/log/nginx/example.com.error.log;

root /var/www/example.com/htdocs;
index index.php index.htm index.html;
include common/locations.conf;

}

Were going to need to make a few changes so that it looks more like this.

# block #1 : redirect non secure traffic to your secure site
server {
listen 80;
listen [::]:80;
server_name wwwexample.com example.com;
return 301 https://example.com$request_uri;
}

#block # 2 :  redirect the www. version to the non www version
server {
listen 443;
listen [::]:443;
server_name www.example.com;
return 301 https://example.com$request_uri;

}

#block #3 :  This is what is where all of the parameters for serving your site are defined
server {
listen 443;
listen [::]:443;
access_log /var/log/nginx/example.com.access.log rt_cache;
error_log /var/log/nginx/example.com.error.log;

root /var/www/example.com/html;
index index.php index.htm index.html;

server_name example.com;

ssl on;

ssl_certificate /etc/nginx/ssl/server.crt;
ssl_certificate_key /etc/nginx/ssl/server.key;
ssl_protocols TLSv1 TLSv1.1 TLSv1.2;
ssl_ciphers HIGH:!aNULL:!MD5;
ssl_prefer_server_ciphers on;

#I use a set of includes for handling common items like PHP, WordPress, Common Locations,  Security
#If you host multiple sites, I would recommend that you do the same.
include common/locations.conf;

}

There are 3 server blocks in this file block.

In server block 1 we listen on port 80

“listen 80;” means that should handle requests on TCP port 80 for IPV4

listen [::]:80 listens of port 80 for IPv6

Port 80 is the standard port used by web servers to server non secure data.

“server_name” specifies which site names this block is corresponding to. Here we have it responding to the domain example.com and the sub-domain www.example.com.

“return 301 https://example.com$request_uri;” On this line we’re telling Nginx to return a 301 (permanent redirect) to the users browser that sends them to the secure version of example.com and to append the page that was requested with “$request_uri” if one was specified.

In server block 2 we listen on port 443

We have basically the same thing in server block 2 as we did in server block 2 execpt here were telling nginx to listen on port 443 which is the standart port used by browsers for SSL.

“server_name www.example.com;” This time were only redirecting the www version to the non www verision.  It’s important that you only have the www version of your domain name on this line. If you were to enter them both your site will not be available.

In server block 3 we listen on port 443 and serve your site

In block 3 we have the code  that actually serves your site.  You will need to take your original server block that you started with and have added

listen 443;
listen [::]:443;

To the top of it so that this block will now only listen on the default secure port 443

server_name example.com;

The site only responds to the non www version of example.com as specified by the “server_name”.  www.example.com is being redirected in block 2 redirecting to the non www version in block 3.

ssl on;

ssl_certificate /etc/nginx/ssl/server.crt;
ssl_certificate_key /etc/nginx/ssl/server.key;
ssl_protocols TLSv1 TLSv1.1 TLSv1.2;
ssl_ciphers HIGH:!aNULL:!MD5;
ssl_prefer_server_ciphers on;

This is the code that actually enables SSL the line “ssl_certificate” needs the path to the .crt file that we generate. The other lines pertaining to SSL should be copied verbatim and define which encryption protocols we will support and how the browser should communicate with the server. !In the “ssl_protocols” do not enable ssl3. It posses a security risk and should remain disabled.

Double check that every comment line start with “#” and every parameter ends in “;”

Hit Ctrl+x to save the changes you’ve made then “y” when prompted followed by “enter”

Now we need to load your modified config into Nginx and we do that by typing this

sudo service nginx reload

If you don’t see an error then you’ve done everything correctly if you do get an error open your config back up and take look everything over again.  It’s most likely the path to the cert, key or a missing semicolon.

Basic step #4 : Enable full SSL in CloudFlare

If you didn’t have an error restarting Nginx at the end of step #3 you can now enable Full SSL in CloudFlare.

CloudFlare Full SSL

CloudFlare Full SSL

Try visiting http://your-site.com then http://www.your-site.com the https://www.yourssite.com they should all now redirect to http://your-site.com where your-site is the name of the website you’ve just configured.

If you are setting this up for a WordPress website you should also install the HTTPS plugin for wordpress.


If you need a great virtual server I highly recommend that you
Sign up for a Linode SSD VPS

After reading through all of this you’ve decided that you would rather leave the management of you server in the hands of professionals have a look at

CloudWays Managed VPS

CloudWays offers VPS management on top of DigitalOcean’s network

That’s it. Hopefully you’ve gotten everything working without too many headaches.  If you’ve found this tutorial useful, are having problems, noticed a mistake or have a suggestion please leave me a comment here on this page.

Filed Under: Hosting Tagged With: CloudFlare, nginx, ssl, ubuntu

LiquidWeb SPAM of Shame

December 21, 2014 by Benjamin Knigge 3 Comments

I like most of you receive several dozen SPAM emails daily.  I thought I would take a few minutes to shame a company and their employee publicly in this blog post. If either of them have an issue with that the simple solution would be to stop sending SPAM. Here’s my critique of both the spam and the company that sent them.

I’ve included the headers but have replaced my actual email address with “Me@MyDomain.com” from each of these emails.  It’s not at all hard to find my email address but I’d rather minimize the amount of spam that ends up in my inbox.

Exibit #1: LiquidWeb Spam #1 from Patrick K. Henderson

This was the first email from Patrick K. Henderson who’s a “Senior Business Development Executive” over at LiquidWeb. Apparently a  “Senior Business Development Executive”s job at LiquidWeb is to send out lots of SPAM in the hopes of attracting new customers. Notice how he mentions my credentials but makes no mention of where he’s seen my credentials or what exactly about them warranted this unsolicited email.  He was however kind enough to enclose a personalized tracking link with a $75 coupon for their service. $75 won’t go far though as their services seem to be several times more expensive than their non SPAM sending competitors.

Delivered-To: Me@MyDomain.com
Received: by 10.27.128.193 with SMTP id b184csp1633315wld;
        Thu, 18 Dec 2014 05:45:35 -0800 (PST)
X-Received: by 10.42.88.212 with SMTP id d20mr2074375icm.32.1418910335253;
        Thu, 18 Dec 2014 05:45:35 -0800 (PST)
Return-Path: <phenderson@liquidweb.com>
Received: from mx01.liquidweb.com (mx01.liquidweb.com. [69.167.129.136])
        by mx.google.com with ESMTPS id t19si231615igr.12.2014.12.18.05.45.34
        for <me@mydomain.com>
        (version=TLSv1 cipher=RC4-SHA bits=128/128);
        Thu, 18 Dec 2014 05:45:34 -0800 (PST)
Received-SPF: pass (google.com: domain of phenderson@liquidweb.com designates 69.167.129.136 as permitted sender) client-ip=69.167.129.136;
Authentication-Results: mx.google.com;
       spf=pass (google.com: domain of phenderson@liquidweb.com designates 69.167.129.136 as permitted sender) smtp.mail=phenderson@liquidweb.com
Received: from zimbra.liquidweb.com ([67.227.128.88]:59949)
    by mx01.liquidweb.com with esmtp (Exim 4.63)
    (envelope-from <phenderson@liquidweb.com>)
    id 1Y1bOX-0008Jm-Lg; Thu, 18 Dec 2014 08:45:33 -0500
Date: Thu, 18 Dec 2014 08:45:33 -0500 (EST)
From: Patrick Henderson <phenderson@liquidweb.com>
To: Me@MyDomain.com
Message-ID: <416432730.624972.1418910333597.JavaMail.zimbra@liquidweb.com>
Subject: Liquid Web - Gift Certificate
MIME-Version: 1.0
Content-Type: multipart/alternative; 
    boundary="----=_Part_624971_400096354.1418910333596"
X-Originating-IP: [10.30.6.5]
X-Mailer: Zimbra 8.5.1_GA_3056 (ZimbraWebClient - GC39 (Win)/8.5.1_GA_3056)
Thread-Topic: Liquid Web - Gift Certificate
Thread-Index: MXQDxaJ2eD2sEDArZiQYmmSeVTFByA==

------=_Part_624971_400096354.1418910333596
Content-Type: text/plain; charset=utf-8
Content-Transfer-Encoding: 7bit


Hello Ben, 

Happy Holidays from Liquid Web! 

Please take a spin on our cloud platform, STORM. Based on your credentials you'd make an excellent customer or employee. Let me know if you sign up today. Thanks. 

https://www.liquidweb.com/campaign/V__Am379v35JU_SHUAchE8ZnR7s 
--------------------------------- 
Patrick K. Henderson 
Senior Business Development Executive 

phenderson@liquidweb.com 
Twitter: @Liquidweb 

Liquid Web, Inc. 
www.LiquidWeb.com 
support@liquidweb.com 

800-580-4985 ext. 2195 TollFree 
517-322-0434 ext. 2195 Int. 
517-322-0493 Fax 

Exibit #2 : LiquidWeb SPAM #2 through SalesFoce.com

This was the second email that I received from LiquidWeb. For the sake of brevity I’m only including the printable version. This second email seems to be an automated response and by salesforce.com.  It was probably triggered by Patrick, one of his lackeys or an automated spam script importing my contact information into salesforce.com

Delivered-To: Me@MyDomain.com
Received: by 10.27.128.193 with SMTP id b184csp1665070wld;
        Thu, 18 Dec 2014 07:31:04 -0800 (PST)
X-Received: by 10.229.135.202 with SMTP id o10mr4665119qct.9.1418916664318;
        Thu, 18 Dec 2014 07:31:04 -0800 (PST)
Return-Path: <sales=liquidweb.com__0-2q6rd9cvgkaoxd@qvu7ml2g4yz5ly.3-pmdyeai.na13.bnc.salesforce.com>
Received: from smtp14-asg.mta.salesforce.com (smtp14-asg.mta.salesforce.com. [204.14.232.77])
        by mx.google.com with ESMTPS id n4si8576270qci.46.2014.12.18.07.31.03
        for <me@mydomain.com>
        (version=TLSv1 cipher=RC4-SHA bits=128/128);
        Thu, 18 Dec 2014 07:31:04 -0800 (PST)
Received-SPF: pass (google.com: domain of sales=liquidweb.com__0-2q6rd9cvgkaoxd@qvu7ml2g4yz5ly.3-pmdyeai.na13.bnc.salesforce.com designates 204.14.232.77 as permitted sender) client-ip=204.14.232.77;
Authentication-Results: mx.google.com;
       spf=pass (google.com: domain of sales=liquidweb.com__0-2q6rd9cvgkaoxd@qvu7ml2g4yz5ly.3-pmdyeai.na13.bnc.salesforce.com designates 204.14.232.77 as permitted sender) smtp.mail=sales=liquidweb.com__0-2q6rd9cvgkaoxd@qvu7ml2g4yz5ly.3-pmdyeai.na13.bnc.salesforce.com
Return-Path: <sales=liquidweb.com__0-2q6rd9cvgkaoxd@qvu7ml2g4yz5ly.3-pmdyeai.na13.bnc.salesforce.com>
X-SFDC-Interface: internal
Received: from [10.232.9.131] ([10.232.9.131:63041] helo=ops-mta1-2-chi.ops.sfdc.net)
    by mx2-asg.mta.salesforce.com (envelope-from <sales=liquidweb.com__0-2q6rd9cvgkaoxd@qvu7ml2g4yz5ly.3-pmdyeai.na13.bnc.salesforce.com>)
    (ecelerity 2.2.2.45 r()) with ESMTP
    id 28/42-15561-733F2945; Thu, 18 Dec 2014 15:31:03 +0000
Received: from [10.234.64.83] ([10.234.64.83:48733] helo=na13-app1-12-chi.ops.sfdc.net)
    by mx3-chi.mta.salesforce.com (envelope-from <sales=liquidweb.com__0-2q6rd9cvgkaoxd@qvu7ml2g4yz5ly.3-pmdyeai.na13.bnc.salesforce.com>)
    (ecelerity 2.2.2.45 r()) with ESMTPS (cipher=DES-CBC3-SHA) 
    id EC/DF-12411-733F2945; Thu, 18 Dec 2014 15:31:03 +0000
Received: from  [10.234.64.50] by na13.salesforce.com via HTTP; Thu, 18 Dec 2014 07:31:03 -0800
Date: Thu, 18 Dec 2014 15:31:03 +0000 (GMT)
From: Liquid Web Sales <sales@liquidweb.com>
Sender: noreply@salesforce.com
To: "Me@MyDomain.com" <me@mydomain.com>
Message-ID: <2Jc6g000000000000000000000000000000000000000000000NGSB3R00HGNSwf6HQQyBoFXgOouN7w@sfdc.net>
Subject: Thank you for contacting Liquid Web!
MIME-Version: 1.0
Content-Type: multipart/alternative; 
    boundary="----=_Part_12143_1411681069.1418916663366"
X-SFDC-LK: 00D30000000pmDy
X-SFDC-User: 00530000004eK6O
X-Sender: postmaster@salesforce.com
X-mail_abuse_inquiries: http://www.salesforce.com/company/abuse.jsp
X-SFDC-TLS-NoRelay: 1
X-SFDC-EmailCategory: workflowActionAlert
X-SFDC-EntityId: 01Wa0000000U7YE
X-SFDC-Binding: 1WrIRBV94myi25uB

------=_Part_12143_1411681069.1418916663366
Content-Type: text/plain; charset=ISO-8859-1
Content-Transfer-Encoding: quoted-printable

Hello!

Thank you for chatting with us today!

It is our sincere hope that by discussing your options, we were able to pro=
vide useful and pertinent information that will assist you throughout your =
search for the perfect hosting provider. From what we have discussed, we fe=
el that Liquid Web will be a great fit for you and cannot wait to take this=
 potential partnership to the next level with our premium hosting, customer=
 service, and Heroic Support.

Please feel free to contact us if you require further assistance and/or hav=
e any additional questions regarding our services. We are available 24/7/36=
5 via phone, chat, or e-mail using the contact information below.

Thank you very much for your time, and have a great day!

Liquid Web Sales
sales@liquidweb.com
800-580-4985
1-517-322-0434 (international)

P.S. Don't forget to sign up for the Liquid Web Shop, where you can get FRE=
E gifts. Sign up at http://shop.liquidweb.com. =20

Copyright =A9 2013 Liquid Web, Inc.
4210 S. Creyts Rd.  Lansing, MI 48917

In this second email they are thanking me for chatting with them however I’ve I’ve never spoken, chatted or emailed with anyone at LiquidWeb. I was busy working on something else and hadn’t noticed either of these messages for a couple of hours. Did they want me to review my product? Maybe they wanted to hire me but for what position?  The first email was vague but mentioned my credentials.  I was intrigued enough to take a look at what it is  they’re selling and to view their companies profile over at GlassDoor.com.  I’ll summarize what I’ve found but feel free to do your own research.  Apparently they’re a poorly run overpriced hosting company located in the dying rust belt town of Lansing Michigan. I can’t imagine why anyone would choose them over a lower cost alternative with a better reputation such as Linode or DigitalOcean managed by CloudWays. Definitely not a place I would want to work.

Their target demographic seems to be the technologically illiterate middle management of the corporate world.  You can’t really hold that against them though as it’s the same profitable uninformed demographic that at least 80% of tech companies are targeting with their marketing.

Exibit #3:  My reply

The emails I’ve received from LiquidWeb have been vague and impersonal enough that I was fairly certain that this was just a slightly targeted SPAM. I decided to reply and confront Patrick at LiquidWeb regarding the past two emails.

MIME-Version: 1.0
Received: by 10.27.87.169 with HTTP; Thu, 18 Dec 2014 09:02:44 -0800 (PST)
In-Reply-To: <416432730.624972.1418910333597.JavaMail.zimbra@liquidweb.com>
References: <416432730.624972.1418910333597.JavaMail.zimbra@liquidweb.com>
Date: Thu, 18 Dec 2014 20:02:44 +0300
Delivered-To: Me@MyDomain.com
Message-ID: <ca+zhljsiywqkjs9d4gggdpfzpgfigsb4ms2-o7emjefc9eojiw@mail.gmail.com>
Subject: Re: Liquid Web - Gift Certificate
From: Benjamin Knigge <me@mydomain.com>
To: Patrick Henderson <phenderson@liquidweb.com>
Content-Type: text/plain; charset=UTF-8

What list did you pull my email off of? I've never contacted your
company before and now I get two emails from your company within 20
minutes of each other.

Your service seems fairly expensive for what you're offering when
compared to Linode, Digital Ocean or Vultr.


Exibit #4: The Denial

Delivered-To: Me@MyDomain.com
Received: by 10.27.128.193 with SMTP id b184csp1693618wld;
        Thu, 18 Dec 2014 09:08:49 -0800 (PST)
X-Received: by 10.42.161.7 with SMTP id r7mr2741984icx.75.1418922528678;
        Thu, 18 Dec 2014 09:08:48 -0800 (PST)
Return-Path: <phenderson@liquidweb.com>
Received: from mx01.liquidweb.com (mx01.liquidweb.com. [69.167.129.136])
        by mx.google.com with ESMTPS id ba7si6128013icb.70.2014.12.18.09.08.48
        for <me@mydomain.com>
        (version=TLSv1 cipher=RC4-SHA bits=128/128);
        Thu, 18 Dec 2014 09:08:48 -0800 (PST)
Received-SPF: pass (google.com: domain of phenderson@liquidweb.com designates 69.167.129.136 as permitted sender) client-ip=69.167.129.136;
Authentication-Results: mx.google.com;
       spf=pass (google.com: domain of phenderson@liquidweb.com designates 69.167.129.136 as permitted sender) smtp.mail=phenderson@liquidweb.com
Received: from zimbra.liquidweb.com ([67.227.128.88]:51239)
    by mx01.liquidweb.com with esmtp (Exim 4.63)
    (envelope-from <phenderson@liquidweb.com>)
    id 1Y1eZD-0000FU-PM
    for Me@MyDomain.com; Thu, 18 Dec 2014 12:08:47 -0500
Date: Thu, 18 Dec 2014 12:08:47 -0500 (EST)
From: Patrick Henderson <phenderson@liquidweb.com>
To: ben <me@mydomain.com>
Message-ID: <1893151440.639959.1418922527626.JavaMail.zimbra@liquidweb.com>
In-Reply-To: <ca+zhljsiywqkjs9d4gggdpfzpgfigsb4ms2-o7emjefc9eojiw@mail.gmail.com>
References: <416432730.624972.1418910333597.JavaMail.zimbra@liquidweb.com> <ca+zhljsiywqkjs9d4gggdpfzpgfigsb4ms2-o7emjefc9eojiw@mail.gmail.com>
Subject: Re: Liquid Web - Gift Certificate
MIME-Version: 1.0
Content-Type: multipart/alternative; 
    boundary="----=_Part_639958_1526176102.1418922527625"
X-Originating-IP: [10.30.6.5]
X-Mailer: Zimbra 8.5.1_GA_3056 (ZimbraWebClient - GC39 (Win)/8.5.1_GA_3056)
Thread-Topic: Liquid Web - Gift Certificate
Thread-Index: FK1WXKLViZKVSI49lUJoMlnST/DLkA==

------=_Part_639958_1526176102.1418922527625
Content-Type: text/plain; charset=utf-8
Content-Transfer-Encoding: 7bit

Hello Ben, 

I ran across your website online. You were not a list, but your background seemed interesting; you would be an excellent candidate for either being a customer or employee. 

Have you heard of Liquid Web? We have never competed in the small budget hosting space, because many of our customers are very serious about their web hosting and they value our support, HEROIC SUPPORT (R). You are not obligated to sign up for FREE HOSTING, but Our cloud platform, STORM, has 3 unique zones here in Michigan and a zone out in Arizona. We'll be opening a zone and hosting in Europe in Q1:2015. 

STORM offers: 

geographic diversity 
high vertical performance cloud servers 
resizing, cloning, image management, and rapid deployments (linux/windows) 
load balancing, ip pools, firewalls, private networks, vpn, etc. 
block storage 
object-storage 
api access and support 

--------------------------------- 
Patrick K. Henderson 
Senior Business Development Executive 

phenderson@liquidweb.com 
Twitter: @Liquidweb 

Liquid Web, Inc. 
www.LiquidWeb.com 
support@liquidweb.com 

800-580-4985 ext. 2195 TollFree 
517-322-0434 ext. 2195 Int. 
517-322-0493 Fax 
------------------------------- 

Caught in a lie

Before trying to sell me his overpriced products again Patrick takes a moment to claim that the reason he’s contacting me is because he came across my website. For some odd reason he fails to mention the name of the website, how he came across it or why he thought I would be interested in they products that he’s trying to sell.  I own two websites. This one and Heptec.com which is an as of yet unfinished single page app that I plan on using to host my resume. Neither of my sites provide my email address.  I’m just guessing here but LiquidWeb most likely bought my email address from someone or pulled it out of the my domain registry records. I think the mention of a possible employment opportunity is deliberately designed to lessen the odds of the email being rightfully called out and flagged as the SPAM it is.


If you’ve received a similar piece of SPAM from LiquidWeb please leave me a comment and let me know. It’s my hope that by posting this I will be able to shame the SPAM sending companies into cleaning up their act.

If Patrick K. Henderson or anyone else from LiquidWeb cares to respond to this post I will be sure to post that correspondence in an update here as well.

Filed Under: spam of shame Tagged With: spam

The quick and EasyEngine WordPress on Ubuntu 14.04

December 13, 2014 by Benjamin Knigge 2 Comments

In my previous post I discussed how to to configure WordPress so that it’s super fast. If you haven’t read over that yet I would recommend reading it and then come back over to this post.

In this post I’m going to cover the easiest way to get WordPress up and running on a newly deployed copy of Ubuntu 14.04.  We’re going to do this using EasyEngine. Not only is it the easiest way to get WordPress installed on Ubuntu It’s also the easiest way to get a (LEMP) stack installed on Ubuntu.

If you haven’t heard of EasyEngine before, you wouldn’t be the only one. I just found out about it a few days ago.  EasyEngine is designed to make it easy to configure your server, create new sites and deploy WordPress.

This method is going to save you a significant amount of time and effort compared to the methods I’ve outlined previously.

If you’re considering moving your WordPress blog from a shared hosting account to your own virtual private server (VPS) I would personally recommend either Linode or DigitalOcean. I currently use them both and they are both reasonably priced and have excellent service. This site is being hosted on a Linode VPS.  If you sign up for either one of them using the links in this article and remain a happy customer I will receive a $20 hosting credit.  In addition DigitalOcean will add a $10 credit to your account.    The methods that I outline here are just as applicable to any other Ubuntu 14.04 server as they are to a VPS with Linde or DigitalOcean.

Log into your Server

Let’s get started first you’re going to need to open a terminal on your server and log in. If you’re not sure how to do that follow your hosting providers instructions.

Update Everything

Now  make sure everything on your server is up to date.  You may be asked to enter your password again after the first sudo command. At the end of each line press enter.

sudo apt-get update

sudo apt-get upgrade

sudo apt-get dist-upgrade


“sudo” Allows permitted users to run commands with elevated permissions.

“apt-get update” looks to see if there are any new versions of the software you already have installed.

“apt-get upgrade” actually upgrades the software to a newer version if one was found when you ran “apt-get update”

” apt-get dist-upgrade” will actually download, remove or install software that has been added, removed or upgraded from the distribution

So now everything on your server should be updated, upgraded and better than ever.

Install EasyEngine

This next step is where all the magic is at.

wget -qO ee rt.cx/ee && sudo bash ee

sudo ee stack install

“wget” can download a file from the internet in this case it’s downloading a file and naming it “ee” from  “rt.cx/ee” then it runs “ee” in “bash”

The second line tells EasyEngine(ee) to install the stack of MySQL, PHP, Nginx and all the dependencies.


Check if everything is working

Let’s take a look and see if everything is up and running correctly. To do that we’re going to need a web browser.

sudo apt-get install lynx

lynx localhost

The first line is going to download and install the lynx text only web browser onto your server.

The second line is going to try to open the default web site being hosted on your server.

You should see something pretty much like this.

Nginx Welcome page in Lynx

Nginx Welcome page in Lynx

Hit “ctrl+q” to quit lynx

 Install Nano

sudo apt-get install nano

Nano is a very simple text editor that we’re going to use to edit a configuration file.

Make EasyEngine more secure

I’m going to recommend making a few changed to the default EasyEngine install.

EasyEngine installs some administration tools on port 22222 to a site named 222222 by default that are used for managing PHP and MySQL. I don’t recommend having unnecessary services and applications running. Let’s disable  these admin tools.  I’m of the opinion that they pose a security risk if you want to re-enable them and secure them via your firewall at a later point you could do that

sudo ee site disable 22222

Here we tell EasyEngine (ee) to disable the site 22222.  What ee actually does is  remove the symlink for the sites config file for 22222 from “/var/nginx/sites-enabled/”.  Think of a symlink as being like the directions or a map to another file.

We didn’t actually delete the contents of the file 22222 we just removed the directions to it from the site-enabled folder. Nginx uses this folder to keep track of which sites it should server.

If at some point you decide that you want to add it back in you can recreate the symlink like this

sudo ee site enable 22222

This tells ee to create a symlink for the 22222 file in “/var/nginx/site-available/” int the “/var/nginx/sites-enabled” directory.

now let make a small change to Nginx config

sudo nano /etc/nginx/nginx.conf

This will open the nginx.conf in the nano text editor. Find the line.

add header X-Powered-By “EasyEngine 2.x.x”

Change “EasyEngine 2.x.x” to something else. Maybe “Fluffy bunny web server” It doesn’t really matter. The reason we’re changing it is that  if there’s ever a bug in on of the packages that are installed by EasyEngine that could allow hackers access to your site or server,  you don’t want to be broadcasting to everyone on the internet that you’ve using it.

Hit “ctrl+x’ to exit from nano you’re going to be prompted if you want to overwrite and save changes hit “y” for yes.


Hopefully none of this has been too painful so far now were ready to create our first wordpress site on your new server.

Create your WordPress site using EasyEngine

Creating a new WordPress site with WP Super Cache enabled with EasyEngine

sudo ee site create your-site.com –wpsc

With this line you’re telling EasyEngine(ee) that you want to create a new site in this case “your-site.com” and to also install and configure the server side portion of WP Super Cache so that your site will be nice and fast.

You should see something like this

EasyEngine User & Pass

EasyEngine User & Pass

Write down this username and password

Write down the username and password that was created by EasyEngine when you created your site.  You can change it once your into your wordpress admin but you’re going need it to get in.


That’s it your new WordPress site is now installed and configured on your Ubuntu server.

You’re going to need to either alter the hosts file on your computer or update your DNS records for your domain before you’ll be able to access your site on your new server. I would recommend creating a free CloudFlare account and using them to host your DNS and use their free content distribution network (CDN).  As I’ve outlined in step #7 of my post 7 steps to make WordPress fast.

EasyEngine can do more than just configure WordPress sites.  I would recommend on heading over and taking a look at everything at it’s capabilities.


If you need a great virtual server I highly recommend that you
Sign up for a Linode SSD VPS

 
After reading through all of this you’ve decided that you would rather leave the management of you server in the hands of professionals have a look at

CloudWays Managed VPS

CloudWays offers VPS management on top of DigitalOcean’s network

If you have any comments,questions, suggestions or problems please leave post a comment here.

Filed Under: Hosting, Software Tagged With: EasyEngine, MySQL, nginx, PHP, Wordpress

Error 0x80004005 VirtualBox Windows?

December 13, 2014 by Benjamin Knigge Leave a Comment

VirtualBox error 0x80004005

Have you experienced  this error or an error very similar to this error after upgrading virtual box?

Result Code:

E_FAIL (0x80004005)

Component:

Machine

Interface:

IMachine {480cf695-2d8d-4256-9c7c-cce4184fa048}


VirtualBox error 0x80004005 on Windows

VirtualBox error 0x80004005 on Windows

This error was encountered on VirtualBox 4.3.20


The Solution is to either downgrade to an earlier version of VirtualBox or remove you existing anti-virus software and install Microsoft Security Essentials prerelease.

I hope that this post helps to save someone else the frustration that I’ve just endured.

Filed Under: Software Tagged With: VirtualBox

7 steps to make WordPress fast

December 11, 2014 by Benjamin Knigge Leave a Comment

Wordpress logo

WordPress logo

By default WordPress is slow. Not a little slow or kind of slow but really slow. WordPress’s slow page load times are costing you money. Whether you are a small business using WordPress as your content management system a blogger making a bit of money from advertising revenue, you should follow these 7 steps that will greatly decrease page load times and increase your revenue.

I’m not going to lie to you and claim that each of these steps is easy but for someone who is fairly computer literate and willing to learn something new you should be able to make it through them with only a moderate headache and well-earned sense of accomplishment. If you would like to forgo the headache you could always hire someone to do the dirty work for you.

#1 Hosting

If you’re using a cheap shared hosting plan you need to stop it now.  If you’re making more than $10 a month of your website or if you plan on making more than $10 a month off of your website  sign up for a cloud based virtual private server(VPS) with a solid state drive.  To be on the safe side you need to plan on spending the greater of $10 or $10 per 30,000  page views per day at peak utilization.   (For example. if your site is doing great and you’re getting 60,000 page views per day on averaged but every Friday you update your blog and you’re getting 140,000 page views on Friday  you would  do the math like this 140/30 * 10 = $46.60)  For the vast majority of you that means you should plan on spending $10 a month. If however you were following this very simplified formula and you came up with a number greater than $100 you should hire me or someone else that is qualified to evaluate your hosting needs more accurately. You should also consider setting up managed hosting.  Do not take this as an opportunity to try to save a couple of dollars.

Select a plan from either Linode or DigitalOcean. I’ve personally used them both and have had excellent experience with both.  As of the time of writing these are the only two companies that I’m willing to recommend.  (Full disclosure this site is being hosting on a Linode VPS and if you use one the Linode or Digitalocean links in this article and stay with the service for 3 months, I stand receive a $20 hosting credit.) In addition DigitalOcean will add a $10 credit to your account.

#2 Setting up your VPS OS and software

Once you’ve selected your hosting plan you’ve got your virtual server but you’re going to need to install and Configure the OS and software.  I would recommend the latest long-term release of Ubuntu Server. Currently that would be 14.04.  it’s relatively simple to install all of the necessary software using apt-get. Installation of the OS should be as simple as selecting the Ubuntu 14.04 from either Linode or DigitalOcean immediately after choosing your hosting package by following the onscreen instructions.  Now we’re needing  to install the web server. Thankfully DigitalOcean has created an excellent tutorial on how to set up and configure Nginx. Nginx web server is able to serve up pages faster while using less memory than the older and more commonly used Apache web server. After you’ve completed the Nginx tutorial ,You should have a working static website . Now you’re ready to install MySQL, PHP and WordPress we’re going to head back over to DigitalOcean you should be able to skip to step two in this tutorial on how to get WordPress up and running on Nginx.

Edit: for an even easier way to install and configure everything read my post “The quick and EasyEngine WordPress on Ubuntu 14.04”

If you’ve done everything correctly you’re probably exhausted but you should be staring at an empty word press site.

IMPORTANT! You’re now the one responsible for keeping your server secure and updated.  I would recommend logging into your server at least once a month and doing “sudo apt-get update” followed by “sudo apt-get upgrade”. You can automate this by following this Ubuntu tutorial. You should also configure a firewall and Fail2Ban.

#3 Move your site to the new server

Install the duplicator WordPress plugin on both your old and new server.  Follow the directions provided by the plugin to backup everything from your old site then copy the backed up files over to your new site and restore them. You should now have a copy of your site on your new server.  One last thing for this step disable any plugins that you have installed that you are not using.

#4 Install Smoosh.it

Install the Smoosh.it wordpress plugin. Smoosh.it will optimize your images making them smaller files that download more quickly. You can even use it to batch process the existing images on your site.

#5 Install and configure WP Super Cache

Install the WP Super Cache plugin  and select the “Use mod_rewrite to serve cache files” and the “Compress pages so they’re served more quickly to visitors” options under the advanced tab.  This is the step that will result in the greatest increase in server performance. Instead of each page request needing to be generated by PHP on each page request a static version of the page will be generated on the first page request. For a period of time (3600 seconds by default) a static and compressed version. will be served by Nginx. Nginx is very good at serving static files quickly and you’ve now turned WordPress into a static file generator.

#6 Install WP DB-Manager

Install WP DB-Manager and use it to optimize and repair your DB. You should use this plugin to schedule the database to be Optimized and Repaired at least once per Month. If your site is frequently being updated and many comments are being posted you should schedule this to occur once per week.

If you’ve made it this far you’re doing great.  Your WordPress site is on your own new VPS and should be amazingly fast but there’s still one more step before your site is live on the new server.

#7 Set up a Free CloudFlare account

Sign up for a free CloudFlare account. Cloudflare is a content delivery network CDN.  The way cloudflare works is that you use them to manage your DNS records.  You’ll need to log in to your domain name registrar to update your name servers. Then when someone makes a request to your site they send that request to the closest server on their network which has a cached version of your site which it then serves to the requester. This results in a much quicker response time for the end-user and significantly less load on your VPS. Their free service is fast but they offer an even faster paid service with additional functionality.


You’ve done it! You’re WordPress site is now incredibly fast.  If you’re still in the need for greater speed many WordPress templates make way too many requests to external js and css files and should also be optimized.


If you need a great virtual server host for your WordPress site I highly recommend that you
Sign up for a Linode SSD VPS

After reading through all of this you’ve decided that you would rather leave the management of you server in the hands of professionals have a look at

CloudWays Managed VPS

CloudWays offers VPS management on top of DigitalOcean’s network


I’ve been a bit brief in some of my descriptions on how to make WordPress Fast. If you have followed all the steps in this tutorial and you’re having an issue or need further details, please ask a question in the comments and I’ll update the article to address your concerns.


Filed Under: Hosting, Software Tagged With: Hosting, nginx, Wordpress

Go needs an IDE and intergrated debugger

December 11, 2014 by Benjamin Knigge 16 Comments

go gopher

go gopher

Go 1.4 was released today and I thought I would write about where I would like to see Google’s Go team dedicate some resources. By writing this, it’s my hope that it somehow manages to make its way back to Google and hopefully they can get to work on implementing a solution.


Go needs an IDE

If you’ve written any go code then you know that there isn’t any standard or even predominantly used development environment or IDE.  From what I’ve gathered by watching the go-nuts Google group and reading other blogs It seems that most people are using either Sublime or LiteIDE. I’ve tried both and can’t say that I’m a huge fan of either one.

I’m of the belief that a good IDE can simplify common tasks and dramatically improve a developers productivity.  At the same time I think a good IDE could rapidly accelerate the adoption of Go which would then lead to further improvements in both the amount and quality of go code.  If you take a look at two of Google’s other projects, Dart and Android you’ll notice that Google has created IDE’s for both, Dart Editor for Dart and Android Studio in the case of Android. In the case of Android Studio this seems to be a highly customized version of JetBrains InteliJ. While Dart Editor uses components from Eclipse. There is currently a plugin for InteliJ that adds some basic go support but I would love to have full-fledged IDE.  I understand that not everyone sees the benefit of an IDE but there are many developers that do. For those that do appreciate the benefits of an IDE this would be seen as a wonderful step forward for Go.


Go needs a working debugger

If you’ve tried to use GDB you know exactly what I’m talking about. GDB doesn’t work with Go.  Writing fmt.Printf everywhere is reminiscent of my early days working with PHP. I’m pretty sure I’m not the only one that would like to see a real working debugger for Go.

An IDE with a working integrated debugger would be a great addition to the Go community.

Filed Under: programming Tagged With: Android, Dart, GDB, Go, Golang, IDE, InteliJ, JetBrains

Linode vs. DigitalOcean vs. Vultr vs. RamNode

December 10, 2014 by Benjamin Knigge 21 Comments

Comparing SSD cloud VPS hosting providers can be difficult

A virtual cpu core at one hosting provider won’t be equivalent to a virtual cpu core at another host or even another virtual cpu core at the same host depending on the specifications of the underlying hardware and the underlying hardware’s utilization at the time of comparison. I’ve seen both Vultr and RamNode mentions along with the cloud vps start-ups Linode and DigitalOcean and I thought that I would do a quick comparison between them all.  For the record I use all four of these VPS hosting companies and wouldn’t have a problem recommending any one of them.   (This site is currently hosted on a $10 per month Linode VPS and if you use one the links in this article and remain a happy customer I stand to receive a hosting credit for referring you.

I’ve tried to do a basic comparison of the low cost plans at 3 price points, that I feel most independent web developers would be most interested in.
One at the lowest cost available from each one of the 4 companies compared.

  • Lowest cost available
  • $10 – $15 with backups if available
  • $20 – $25 with backups if available
 SSD cloud VPS comparison
Lowest monthly plan $10-$15 $20-$25
Linode cost: $10Ram:1GBvirtual cores:1

Disk: 24GB

Bandwidth: 2TB

cost: $12.50($10 + $2.50 for 4x backup images)

Ram:1GB

virtual cores:1

Disk: 24GB

Bandwidth: 2TB

cost: $25($20 + $5 for 4x backup images)

Ram:2GB

virtual cores:2

Disk: 48GB

Bandwidth: 3TB

DigitalOcean cost: $5Ram: 512MBvirtual cores:1

Disk: 20GB

Bandwidth: 1TB

cost: $12($10 + 20% for backups)

Ram: 1GB

virtual cores:1

Disk: 30GB

Bandwidth: 2TB

cost: $24($20 + 20% for backups)

Ram: 2GB

virtual cores:2

Disk: 40GB

Bandwidth: 3TB

Vultr cost: $5Ram:768MBvirtual cores:1

Disk: 15GB

Bandwidth: 1000GB

cost: $15Ram:2GBvirtual cores:2

Disk:40GB

Bandwidth: 3000GB*

(*for servers in the USA & Europe)

N/A(next price point is at $35)
RamNode cost: $1.25($15 billed annually)

Ram: 128MB

virtual cores:1

Disk: 12GB

Bandwidth: 50GB

cost: $14Ram: 2GBvirtual cores:2

Disk: 80GB

Bandwidth: 3000GB

cost: $21Ram: 3GBvirtual cores:2

Disk: 100GB

Bandwidth: 3500GB


At this point I think it’s important to note that RamNode isn’t offering the same type of service that Vultr, Linode and DigitalOcean are providing. RamNode can be more closely compared to traditional VPS provider as they lack, hourly billing, with only a monthly billing option available and also fail to provide an API for integration.

Let’s take a look at some benchmarks that have been provided by vpsbenchmarks.com

CPU utilization

CPU utilization

Here we have the average CPU utilization this can give you a general idea of how each virtual CPU at each VPS provider actually performs.  The reality is , It doesn’t really matter how many or how fast the virtual CPUs are assigned to your VPS. If they’ve been over allocated multiple virtual CPUs rated at a high speed may not perform as well as a single slower rated CPU that hasn’t been over allocated.

In this test DigitalOcean performs the worst, with Ramnode having the best performance.  I wouldn’t categorize any of these servers as performing badly.


response time

response time (lower is better)

This shows the average response time when making a request for a page on each VPS. Response time is a pretty important metric when it comes to web servers. Slower response times means that your users will have to wait longer and are more likely to lose interest and leave.  In this test DigitalOcean didn’t perform very well when compared to the others but that’s only because the other VPS providers are performing exceptionally well. Vultr’s results are really outstanding.

If you head over to vpsbenchmarks  they include a lot more benchmarks, reviews and other details regarding these four VPS providers as well as many others.


You can also check out the benchmarks over at ServerBear.com for a second set of results.

For many applications raw performance is what’s most important for other applications such as a website, network reliability and IO speed may be more important than raw cpu power. In this area both Vultr and RamNode perform exceptionally.

With DigitalOcean you can scale an individual VPS up but not back down again while with Linode you can scale and a single “node” up and then back down.  Linode also has managed hosting as an option. They both have excellent support and the tutorials that DigitalOcean have been putting out are excellent.

In conclusion who you choose between these four VPS providers really depends on you and your application.

If you want the absolute lowest cost SSD VPS or getting the most performance for your dollar spent is the most important and you don’t want or need the ability to quickly resize your VPS or bring new servers online via an API RamNode is the way to go.

If you like the idea of quickly bring new instances on and offline with hourly billing either via the web gui or API with excellent performance and a low latency network or if you need to host a windows VPS, provide your own ISO or install CPanel Vultr is probably the right choice for you.

If you want the ability to easily and rapidly scale up but you only have $5 budget during development or you want a service that provides excellent documentation DigitalOcean would be the perfect fit.

If you want the ability to scale up rapidly or up and down on the same VPS and are willing to spend at least $10 a month for slightly better performance than Digitalocean go with Linode.

I’m personally using Linode currently for this site although I plan on moving everything over to RamNode once my existing credit is used up with Linode due to the dramatically better performance with RamNode. I’ve also set up clients sites at DgitalOcean and Vultr with Vultr offering both better performance and more memory for low end $5 VPS.

Staying on top of the management of a virtual server can be both time consuming and frustrating. If VPS management isn’t something within your skill set I would highly recommend using a managed VPS. A managed VPS will cost significantly more than a self managed VPS but you won’t have to worry about keeping the software updated, truncating log files or process monitoring. All of that ends up costing a bit more but you’ll feel a lot less stressed when something goes wrong at 3 am on a Saturday morning. For Managed VPS hosting I highly recommend RoseHosting. A Managed VPS that is more than adequate for a typical small business website with RoseHosting is going to cost just under $40 per month for hosting. Just give them your requirements and they’ll set everything up so that it meets their requirements. Although they state that they will make their best effort to configure your VPS to your requirements in their service agreement, the last time I spoke with their support department they told me that as of now they’ve never failed to configure a server as per a clients specifications.

Everything is subject to change and what was true at the time of writing may not be true tomorrow.

I hope you’ve found this information useful. Here are the links to each of the virtual private server hosting companies that I mentioned in this post.

Choose Linode

Choose DigitalOcean

Choose Vultr

Choose RamNode

Choose RoseHosting

I also have a pages with coupons, promo and discount codes for each of these services that I update frequently. You may be interested in taking a look if you’re planing on giving one of them a try. Rather than post the coupon codes here and potentially forget to update them in the future it makes more sense to link out to the coupon page and I’ll update them there as needed.

  • Linode coupons
  • Digital Ocean coupons
  • Vultr coupons
  • RamNode coupons


That’s it for this post. I hope that you’ve found this information helpful in your quest to choose a decent VPS host. If you have anything you would like to say on the topic please leave me a comment. If you would like to stay informed regarding the latest posts, please fill out the big black box on the right hand navigation and join the OdinSQL newsletter.

Filed Under: Hosting Tagged With: Cloud, DigitalOcean, Hosting, Linode, RamNode, VPS, Vultr

  • « Previous Page
  • 1
  • 2
  • 3
  • 4
  • Next Page »

Who’s behind Odin SQL

Benjamin KniggeWhen I'm not traveling, writing code or optimizing stored procedures I can often be found working on my blog. Learn More…

Email Newsletter

Sign up to the Odin SQL newsletter and receive the latest posts and custom personalized content.

Recent Posts

  • How I improved my WordPress GTmetrix grade
  • A Vultr walk-through
  • DreamHost coupons and promo codes
  • WPEngine coupons and promo codes
  • GoDaddy vs. HostGator vs. BlueHost vs. DreamHost

Categories

  • Hosting
  • Meta
  • programming
  • Software
  • spam of shame
  • Uncategorized
  • web development
  • wordpress

Featured Post

How I improved my GTmetrix page speed and yslow scores.

How I improved my WordPress GTmetrix grade

I’ve managed to improve my GTmetrix page speed and Ylow grades from the mid 70’s to 98% for Page Speed and 97% for YSlow with a page load time of only 1.18 seconds. Here’s a link to the report (if the link is dead feel free to re-run the test). In this post I’m going to […]

Featured Post

Vultr walk-through

A Vultr walk-through

I’ve mentioned Vultr in several of my previous blog posts. I’ve covered how Vultr significantly outperforms their main competitor DigitalOcean in both price and performance in the low cost solid state drive (SSD) virtual private server (VPS) hosting market. Today I thought that I would do a walk-through of Vultr via a series of annotated […]

Featured Post

Vultr vs. Digital Ocean

DigitalOcean vs. Vultr – which is the better VPS?

  If you’re looking for an in depth comparison of DigitalOcean vs. Vultr you’re in the right place. In this post I’m going to outline the pros and cons of each, provide you with benchmarks and makes my own recommendations. Let’s get started. What are the pros and cos of Each. DigitalOcean DigitalOcean has been […]

Copyright © 2025 — OdinSQL.com